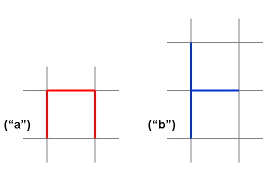
An m-by-n rectangle grid has (n+1)m+(m+1)n=2mn+m+n mesh elements. For this number to be divisible by 3 (the size of the mesh animal), we must have either m=n=0 (mod 3) or m=n=2 (mod 3).
For convenience, let us introduce the following terminology: we will say that a mesh animal faces in a particular direction, according to its orientation. Here are the two mesh animals in question, again:

Mesh animal "a" will be said to face "up" in this orientation, and mesh animal "b" will be said to face "to the right".
When tiling a rectangle with mesh animal "b", the outer-most mesh elements can only be tiled by mesh animals facing inward. Each such animal covers two elements in the same edge of the rectangle. Therefore, each edge of the rectangle must have an even number of edges. Therefore, we must require m=n=0 (mod 6) or m=n=2 (mod 6) for a solution to be feasible.
Let us return to the point that the outer-most layer of mesh animals must all be turned inwards. For m=n=2, these outer-most mesh elements are all that is needed for a successful tiling.
For larger rectangles, let us suppose (not as a necessity) that the inward-facing mesh animals we have already placed are interlaced with outward-facing mesh animals that cover the gaps between them. What we have tiled, if we do this, is a frame or a passe-partout. Such a frame is demonstrated in the figure below.
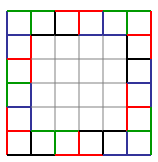
An identical looking passe-partout can be tiled using mesh animals of type "a". Consider the position of a mesh animal of type "a" to be the grid position in its center. Using this terminology, the grid element that is the bottom-left corner of the rectangle must be filled, and the animal filling it must be facing either left or down (otherwise it is impossible to cover both mesh elements touching the corner). Let us suppose, without loss of generality (as we can mirror-flip the rectangle around a 45-degree axis) that it faces left. It is simple to deduce that the animal immediately above it must be facing up. So must the animal above it, and so on until the next corner. Repeating the same logic with the new corner tile, we reach the conclusion that all other grid elements along the top-most edge of the rectangle must be filled with animals facing right. The same logic can be repeated for the next two edges, showing that all animals along them have fixed orientations. In fact, there are only two possible solutions: either all are facing clockwise or all are facing counter-clockwise. The end result is demonstrated in the figure below.
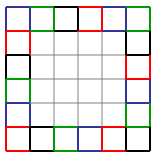
In trying to tile a square using mesh elements of type "a", we must therefore first begin by tiling this outer border. For squares of size 2x2 and 3x3, this is all that needs to be done. For larger squares, there is a gap in the middle that needs to be filled.
Now, consider the dual lattice, produced by turning every lattice element by 90 degrees around its center. Here is what happens to the mesh animals on the dual lattice:
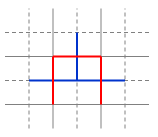
The two animals become one another.
If we take all the grid elements left after removal of the outer frame from a rectangle, and consider what is left in the dual grid, what is left is, again, a rectangle. So, for m,n > 3, an m-by-n rectangle can be tiled by mesh animals of type "a" if and only if an (m-3)-by-(n-3) rectangle can be tiled by mesh animals of type "b".
This means that in addition to 2x2 squares, mesh animals of type "a" can only tile n-by-m rectangles if m=n=3 (mod 6) or m=n=5 (mod 6).
We showed that these conditions are necessary. We can also show that they are sufficient. To see this, consider that we have already demonstrated how mesh animals of type "a" can be used to tile a 2x2 and a 3x3 square, and how a 2x2 square can be tiled by mesh animals of type "b". To tile any larger square of possible size, merely fill in the outer frame as described, then solve the problem recursively for a smaller square by looking at the remaining tile elements in the dual grid.
Below are two examples of tilings that can be produced in this way, color-coded so that the red-yellow animals signify animals that were placed directly on the grid, whereas the blue-green animals are those that were first placed on the dual grid, then translated.
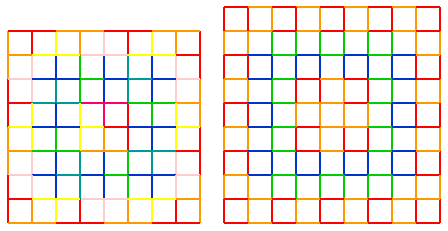
As can be seen, the tiling is composed of a sequence of nested frames.
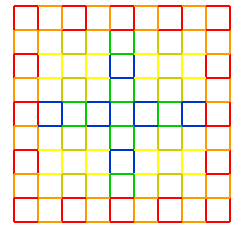
Consider a square with size 2n+1. Its tiling must consist of an outer frame, as described in Part 1. Having placed the frame, let us stretch four rows of tiles towards the center of the square, one from the center of each edge, all facing inward. They all reach one grid point from the center square, but the center itself remains empty.
This procedure divides the large square to four squares of size 2n-1+1 at the four corners of the original square, with each of these squares already having a tiling of its frame. Let us therefore continue recursively by dividing these squares into smaller squares, etc.. The resulting tiling is connected.
The image below shows such a connected tiling for a 9x9 square. Colors attempt to highlight the tiling order described.
To show this, consider tiling using mesh animal "a". We have shown that the "frame" construction around rectangles is inevitable. This immediately rules out the possibility of creating a 2-by-n non-square rectangle. 3-by-n and 5-by-n rectangles are likewise ruled out. Once the frame is in place, no tiling can simultaneously cover all mesh elements marked green below.
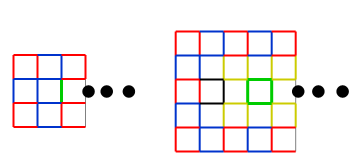
(Also, if 5-by-n rectangles can't be tiled by animal "a", 2-by-n rectangles can't be tiled by animal "b".)
This leaves us with the question of higher-order rectangles satisfying the same restrictions as were derived in the solution to Part 1. If we were to construct all possible 9-by-n and 11-by-n rectangles, the rest can be derived by adding frame layers, as was done in the solution to Part 1.
Alternatively, if we can create 6-by-n and 8-by-n tilings with mesh animal "b", we can prove the same thing on the dual lattice. The figure below shows how such mesh animals can be constructed using zero or more repetitions of the pattern shown in the middle part.
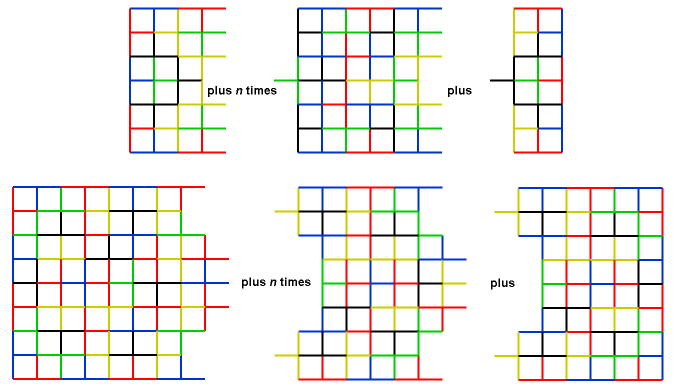
First, here are the smallest four squares which can be created using this mesh animal.

To create larger squares that are 0 or 2 (mod 6), the scheme below can be employed.
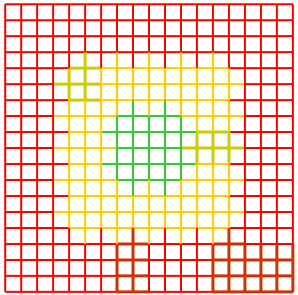
Here, a frame, marked in red, surrounds 0 or more repetitions of a yellow passe-partout, finally closing on a green center-piece. The red frame is composed of four corner pieces (one of which is highlighted) and repetitions of an edge piece (also highlighted). Similarly highlighted are corner and edge pieces composing the extendable yellow passe-partout. The green centerpiece can be as shown or can be omitted, with the passe-partout (or the red frame) closing in directly on itself. The exact tiling of the corner, edge and centerpieces from the basic mesh animals are left as an exercise to the reader.
The squares for sizes 3 or 5 (mod 6) are created using a similar scheme.
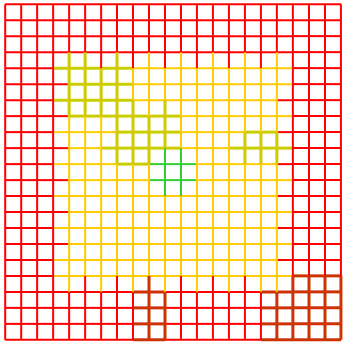
The same general formation is used here (with the same colors and highlighting), and the edge-pieces are likewise as in the previous scheme, but the corner and centerpieces have be been adjusted for an odd-length size. Notably, there is no way to tile the straightforward variant of the passe-partout corner-piece as adjusted for odd-lengthed frames, so two super-imposed corner pieces are tiled together. This also means that four different centerpieces are needed in order to tile all the various sizes. The centerpiece in the image is the smallest of these four. All four are tileable, and the exact method in which this is done from basic mesh animals is, again, left as an exercise for the reader.